First the blog has recently had a total revamp. All the old posts are gone, or waiting to be rewritten. I am starting over now. Starting a blog about life in my world. I'm not going to try to force things. Just going to let it do it's thing. Now onward!
My daughter was born nearly four months ago. From that day on my life has forever changed. My life is a beautiful mess at times, and I love every second of it. I'm married to my first love, and my best friend. I have a home I feel safe and welcomed in. I feel like I belong in my own skin for the first time in years.
I find that my day is spent doing a hundred little things that need done, and still missing ten or so. One thing I never seem to be able to keep up with is laundry and my coupons. I am currently two weeks behind on my coupons.
My life is somehow extremely quiet, to me anyway. This dawned on me this past weekend when my family was in town for Easter. My little girl, Harlee, was way worn out by the experience. Our life consists of mostly hanging out on our own. My husband, Josh, usually wakes up an hour or two before he has to get ready to leave for work and gets home very late at night. His days off are mostly spent doing things for work, so for the most part it's me and Harlee. About every other Saturday she visits my mom for the night, we call her Loli. We almost always see her at least once a week though, even if Harlee doesn't spend the night. About once a week we go to the store, maybe, and every few days we make the trip to the end of the block to get the mail. Also every so often we might see a friend out and about at the store, or one might come over but it's rare. So quiet life is an understatement. Still my daughter does not live in a bubble, and is actually a very social baby. Just maybe not more than two or three people at once. I don't think I have ever had her around so many people as I did this weekend, in fact I know I haven't. At the end of it I think she was as ready as I was to get back to the quiet life. We are looking forward to getting out more and hanging out with more friends now that she's a little older, and flu season is over.
So my life is still ever changing, but it looks as if all these changes are good ones. I am happy and content with my life. There's still a few things here and there I'd like to iron out, but it's getting there. I am one very lucky girl.
Friday, April 25, 2014
Wednesday, April 24, 2013
Adventures in Chicken Alfredo Shells
So I know I've had a TON of food posts but that's all I have ready right now. Eventually I will have more up I promise. I have a couple of art projects I'm working on getting up. At any rate dinner tonight...
So today I made Chicken Alfredo Shells! SOOOO yummy!!!


So today I made Chicken Alfredo Shells! SOOOO yummy!!!

So I kinda forgot to take step by step pics... Oops... But these were actually pretty easy to make!
What you'll need!
1 jar Alfredo
cooked jumbo shell pasta (about 24-28 shells depending on your casserole dish)
2 cans of chicken shredded
1 block cream cheese
1 can of cream of chicken (or cream of mushroom, or cream of chicken and mushroom which is what I use)
Some milk (will explain)
1 cup panko bread crumbs
1/2 cup grated Parmesan
1 cup shredded mozzarella
So you've cooked your pasta! Awesome! Now in a big bowl mix the cream cheese, chicken, and can of cream of whatever. Tada you have filling!
Now prepare your casserole dish. Pour about half the Alfredo into the casserole dish and make sure it coats the bottom. Now fill the jar with milk and replace the lid, now shake it up. (this is why a jar is important) Set the jar of milky Alfredo to the side.
Ok you are ready to stuff your shells! Stuff them with the cream cheese mix and line them up in the casserole dish. Now pour the milky Alfredo around the shells.
Now for the topping! Combine bread crumbs, shredded mozzarella, and Parmesan. Sprinkle liberally over the top and pop in the oven for about twenty to thirty minutes at 350. Bake until the top is golden brown and the sauce is bubbly. Now enjoy!!!
So I had some left over filling... I didn't stuff mine enough and I made WAY too much pasta shells. So I have a left overs recipe I made too. That one I stuck in the fridge until we're ready to eat it. When I bake it I'll make a post about it.
BONUS!!!!
Cheesy Garlic Crescents!

I made these to go with the shells. SO easy to make!
1 can crescents
1 spoonfull minced garlic (I keep a gaint jar of it in my fridge)
3 spoonfulls spreedable butter
1 handful shredded mozzerella
Mrs. Dash (I just eye balled this one... maybe a tsp or two)
Mix everything other than the crecents together into a paste. Open your crescents and roll them out flat. Spread butter mix over the crescent dough. Now pull off each crecent and roll up and bake as normal. Tada!
So this one was a bit sketchy... I promise I'll remember to get step by step pics next time and messure things better.
Love,
~Jamie
Sunday, March 3, 2013
Adventures in Banana Nut Breakfast Cakes!
So this is recipe three based off this Pinterest post....
http://pinterest.com/pin/296182112963752106/
This is so far the furthest from that post. In fact basically almost nothing is left from that post....
Anywho....
So here's what you need. You need a box spice cake mix, some ripe banana's (I used six normal sized ones... I think they were normal sized...), some walnuts chopped up into tiny bits, and a mini bunt pan. That's everything shown here...

Now there were some more that I didn't take a picture of. That's more walnuts not as finely chopped, powdered sugar, a splash of milk, and maple syrup. I'll explain as we go on....
So mash up your bananas! They will be easier to mash if they are good and ripe. Mine appeared to be but in fact were not quite as ripe as I had hoped....

See? I bit chunky... Oh well.... Now it ended up making about just under two cups of mashed bananas, and that's what you want. So add that to the dry mix, along with the finely chopped walnuts. (Not the bigger ones.) Now mix it up real good and you'll get a thick batter, but not quite as thick as the pumpkin batter.

So here's a very important part! This batter is sticky so you have to prep you pan or the cakes wont come out. Spay it down with cooking spray and dust some powdered sugar in. Or however you prep your cake pans, this is just how I prep mine.
Now those other walnuts? Take them and add some to the bottom of each little bunt before you pour the batter in. Then add the batter and fill it on up!

Notice how full my cake things are? Yeah, I got kinda worried while they were baking because this cake batter rises the best out of all the ones I've done this week... However it turned out perfect! Nothing over flowed and nothing rose too much.
Bake on 350 for about half an hour. Mine took thirty minutes but they can take a bit longer. These were definitely not as quick as either of the muffins. As a matter of fact I baked them up Friday afternoon and served them for breakfast Saturday morning. They take a lot more prep and a lot more time to cook. They reheat perfectly though and don't even have to be warm if you don't want to bother with it.
Now pull them on out. You'll need to flip them out of the pan and onto a rack that's sitting on a sheet pan. This is so they will cool faster, and so you can get the icing on them without it getting everywhere.
So while they're cooling let's make the icing! I made a maple icing and it was the perfect touch! Very simple. I mixed abut two table spoons of maple syrup with a splash of milk and about a cup and a half of powdered sugar. You want to add the sugar bit by bit. In the end you want it to be thick enough that it doesn't just completely run off the cakes and seem watery. You can add sugar to thicken it, and a tiny bit of milk to thin it if necessary. Try not to have to thin it because then you'll end up with a ton extra and it won't taste as much like maple. Two hints to keep you're icing from completely running off the cake. Let your cakes completely cool, and pop the icing in the fridge for about five minutes. A hint if your icing is too thick, ice the cakes while they're still a tad warm, mostly cool though. Anyway here's what they should look like iced and baked.

Don't they look so yummy?!

Mmmmmmmm.......
Now these by far got the best reviews. They were the most cake-like out of all the baking I did this week. They were rich, and yummy, and just sooooo good....

The boys loved them, though the youngest said he could do without the nuts. (He kinda hates nuts... Oops...) The oldest tried really hard to steal mine and the one we were saving for someone else. It should be noted that he ate at least ten of the twenty four Harvest Muffins. Two of my test subjects took theirs to work. One came home saying people tried to steal it, and that I need to stay up here and bake forever. The other test subject, my grandmother, shared her's with a co-worker and they both loved it. So this is definitely the winner.
However let's recap shall we? Wednesday I made twenty Pumpkin Muffins, by Thursday there were only five left. Friday I made twenty four Harvest Muffins, and six Banana Nut Breakfast Cakes. There is currently to my knowledge four Harvest Muffins, and one Banana Nut Cake left... That's forty muffins, and five mini bunt cakes in four days people.... I mean by the time I get there tomorrow I bet it's all gone!
I'd say this baking adventure was a success. Wouldn't you?
By the way the grand total for all three recipes came out to less that twenty dollars for all the ingredients. That's with the more expensive ones for the Harvest Muffins. So recap. That's six breakfast cakes and forty four muffins, for less than twenty bucks. It pays to bake things yourself!
Total prep time for everything was maybe two and a half hours out of my week. The muffins were thirty to forty five minutes, and the cakes about an hour to an hour and a half. Also while they were baking I totally had time to do the clean up.
All in all this is definitely something I will do again. The Harvest Muffins were my favorite, so I see making them on a regular. Though I'm sure my arm could be twisted into doing the cakes again too. As a matter of fact I'm eating mine now since I opted out of sweets for breakfast yesterday.
Until my next Adventure!
<3 Jamie
Adventures in Midnight Spicy Ramen
Ok sooooo.... Midnight snack attacks for me often produce awesome results....
This time I made this wonderful thing! Spicy Ramen! Easy Spicy Ramen!


This time I made this wonderful thing! Spicy Ramen! Easy Spicy Ramen!

Doesn't it look SOOOOOOO good? Well it is! Here's how to make it! First what you need...

So it's beef Ramen, some red pepper flakes (I used a packet from a pizza place. ^^ ), some chopped green onion, some minced garlic (I keep a jar of the stuff in the fridge, best idea ever.), and two slices of bacon all cut up.
Now what you'll do is boil the noodles in some water until they are about half done. Then you'll dump the spice packet in and all the extras. You'll basically follow the directions on the back of the Ramen pack. (Yes there's directions...) Only you'll add all the extras and the spices halfway through the noodles cooking. It won't take but maybe two minutes max for the bacon to cook through, but make sure that happens before you serve. It'll look like this after you dump everything in.

See way easy! All you do is basically dump it all in and cook it. You don't even really have to wait for the noodles to be half done if you like firmer noodles.
Well that was short... Enjoy! Just remember these are spicy! To cut the spice use less, or no chili flakes. Though why wouldn't you want it spicy?
Well until my next Adventure!
Jamie <3
Friday, March 1, 2013
Adventures in Harvest Muffins!
So I'm still playing with this thing I found on Pinterest....
http://pinterest.com/pin/296182112963752106/
Now, I know it's only been a couple of days since I made that last batch in this post. The thing is that those twenty muffins are already gone. My little brothers loved them. They each had two after school yesterday, and have had one for desert every night, and I was eating them for breakfast and a more healthier snack. To say the least they were a huge hit. Anywho....
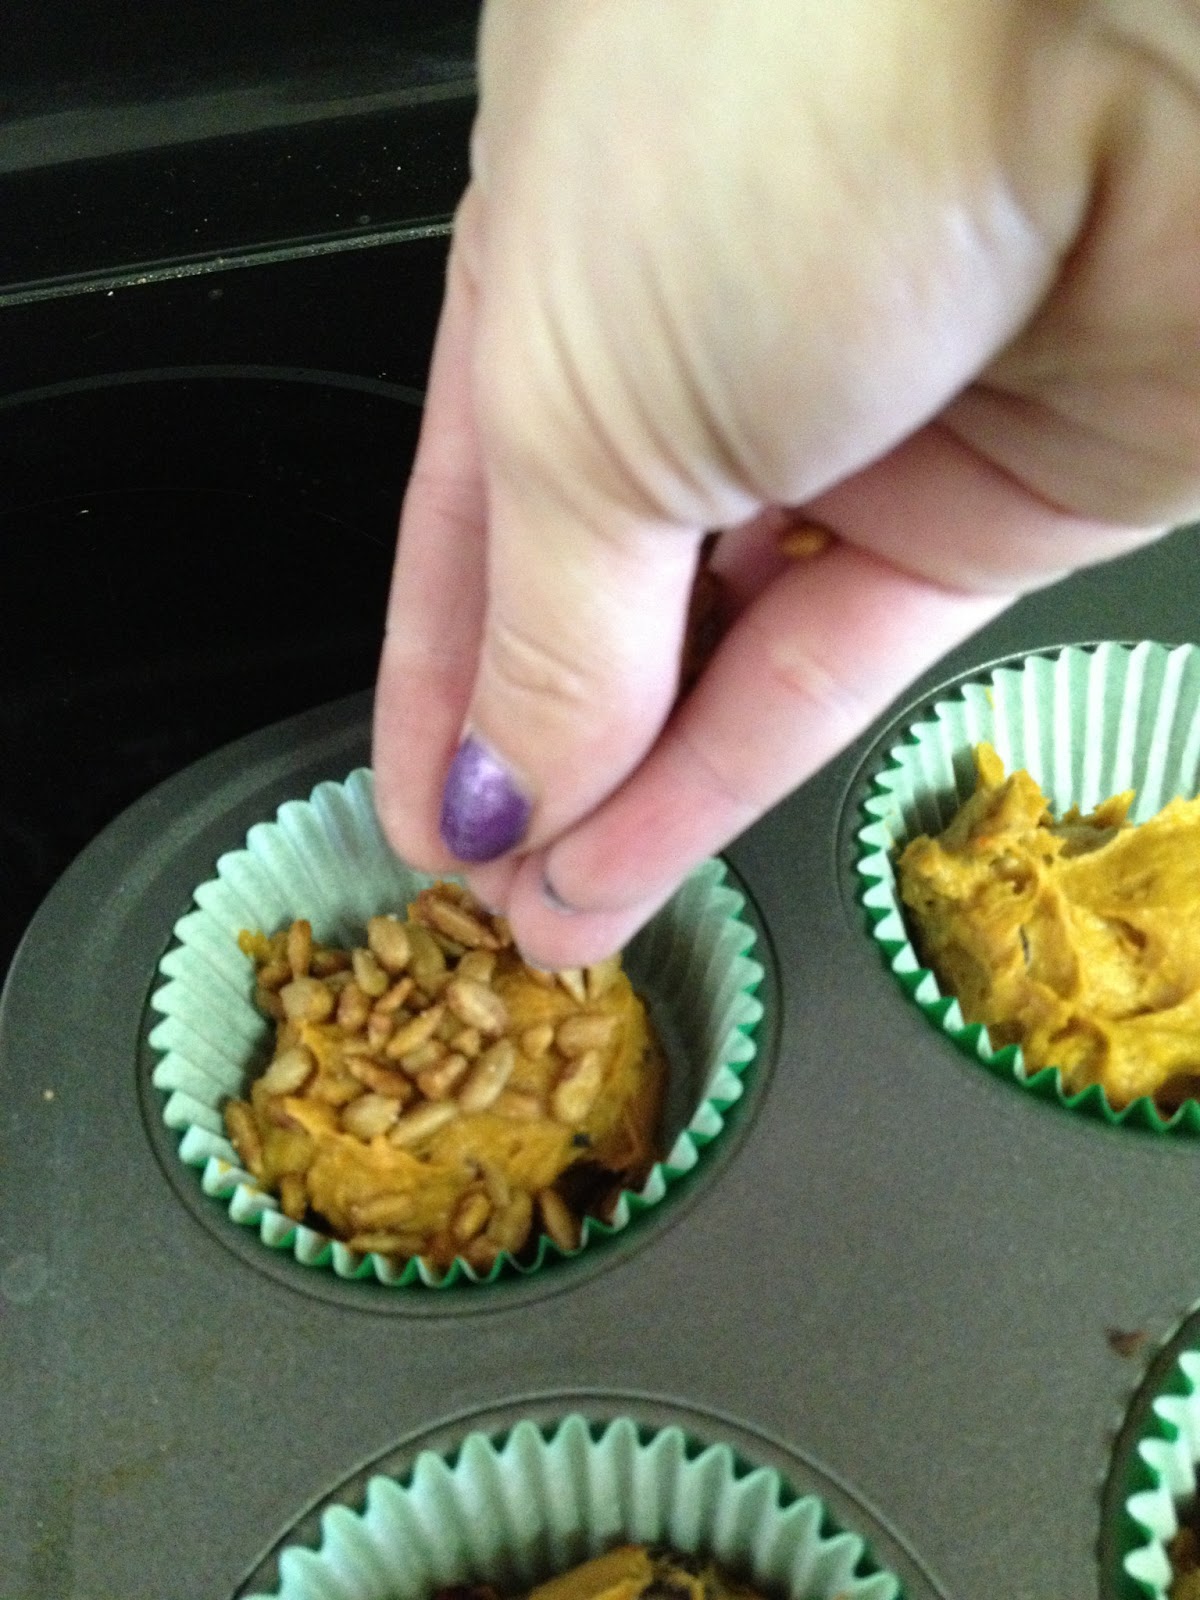
Today I decided to try what I call harvest muffins. I made them with carrot cake this time, pumpkin, dried cranberries, and sunflower seeds.

Now these weren't quite as easy as the last ones. It's still fairly simple just a few more steps. Like before dump your cake mix and pumpkin into a big mixing bowl. This time though pull a bit of the dry mix out into a smaller bowl and dump the cranberries in that. You have to coat the cranberries in the mix so that they don't fall to the bottom of the batter. Though this batter is so think and sticky it might not be necessary, but better safe then sorry. Now dump the cranberries in after you mixed the pumpkin and mix it all up.


Now that it's all mixed you need to put it into some muffin cups. Now I found the best thing ever in Dad's kitchen. This scooper thing that is the best size for this recipe! So much easier than the spoon with this think batter.


Now I added another ingredient at this point that I forgot in the first picture....

Sunflower seeds!!! I used honey roasted seeds, but any will do. It doesn't even have to be sunflower seeds. It can be nuts, or whatever grains or seeds you want. So take a bit and sprinkle it over each muffin, you might need to pat it just a bit to make sure they stick. Just remember this batter is sticky so it's probably going to get all over your fingers. (Which was cool by me the batter tasted like peanut butter! ^.^ )


Now bake them on up in the oven at 350 for about fifteen to twenty five minutes. Mine took twenty. This cake mix takes a bit longer then some others. This mix also puffed up a bit better than the spice cake. Them seemed to rise more. Now tada! You're done!

Now I'm not a carrot cake fan, but these things looked soooooo good.


Again they're nice and fluffy. The cranberries were a very nice touch. It doesn't really taste all that much like carrot cake, more like a rich spice cake. Almost like coffee cake. The bit of salt from the sunflower seeds was good too. These were pretty good. The boys are going to be home soon and they don't know it yet, but they're about to be guinea pigs. Muhahahaha!! Tomorrow Banana Nut! Don't worry they'll get eaten, around here nothing this yummy lasts.
Well until my next adventure!
Jamie <3
http://pinterest.com/pin/296182112963752106/
Now, I know it's only been a couple of days since I made that last batch in this post. The thing is that those twenty muffins are already gone. My little brothers loved them. They each had two after school yesterday, and have had one for desert every night, and I was eating them for breakfast and a more healthier snack. To say the least they were a huge hit. Anywho....
Today I decided to try what I call harvest muffins. I made them with carrot cake this time, pumpkin, dried cranberries, and sunflower seeds.

Now these weren't quite as easy as the last ones. It's still fairly simple just a few more steps. Like before dump your cake mix and pumpkin into a big mixing bowl. This time though pull a bit of the dry mix out into a smaller bowl and dump the cranberries in that. You have to coat the cranberries in the mix so that they don't fall to the bottom of the batter. Though this batter is so think and sticky it might not be necessary, but better safe then sorry. Now dump the cranberries in after you mixed the pumpkin and mix it all up.


Now that it's all mixed you need to put it into some muffin cups. Now I found the best thing ever in Dad's kitchen. This scooper thing that is the best size for this recipe! So much easier than the spoon with this think batter.


Now I added another ingredient at this point that I forgot in the first picture....

Sunflower seeds!!! I used honey roasted seeds, but any will do. It doesn't even have to be sunflower seeds. It can be nuts, or whatever grains or seeds you want. So take a bit and sprinkle it over each muffin, you might need to pat it just a bit to make sure they stick. Just remember this batter is sticky so it's probably going to get all over your fingers. (Which was cool by me the batter tasted like peanut butter! ^.^ )

Now bake them on up in the oven at 350 for about fifteen to twenty five minutes. Mine took twenty. This cake mix takes a bit longer then some others. This mix also puffed up a bit better than the spice cake. Them seemed to rise more. Now tada! You're done!

Now I'm not a carrot cake fan, but these things looked soooooo good.


Again they're nice and fluffy. The cranberries were a very nice touch. It doesn't really taste all that much like carrot cake, more like a rich spice cake. Almost like coffee cake. The bit of salt from the sunflower seeds was good too. These were pretty good. The boys are going to be home soon and they don't know it yet, but they're about to be guinea pigs. Muhahahaha!! Tomorrow Banana Nut! Don't worry they'll get eaten, around here nothing this yummy lasts.
Well until my next adventure!
Jamie <3
Wednesday, February 27, 2013
Adventures in pumpkin muffins....
Soooo.... I found this on Pinterest....
http://pinterest.com/pin/296182112963752106/
It's for TWO ingredient pumpkin muffins. Which I have to say are the best idea EVER! I've been wanting to try this for a while and now I have! Here's what happened....
First off I varied mine just a bit, I used a spice cake mix instead of a yellow cake mix. Mostly because I saw the mix at the store and thought it sounded better.

So it's pretty easy. Just open both and mix them together. No adding eggs, milk, oil, water, none of that. Just the dry mix and the pumpkin. At first its a bit hard to get the pumpkin to mix.

But just dig in there and give it a good stir! Don't try to fold it in nicely or it won't mix. Eventually you'll get this! A nice thick batter! Yes it will be thick, and very orange. Not that the picture does it much justice on the color.

So then you just put it in muffin cups! It's supposed to make 24. Mine made 20 cause I over filled a couple. Also I had a bit of trouble with the sticky batter and lost a bit. I suggest patience with this step.

Now pop them in the oven at 350 for about 15 to 20 minutes. Really it doesn't take long at all. They will rise some but not a whole lot.

Tada! Pull them on out of the oven! Just make sure they're finished just like you would cupcakes. The house smells wonderful! All in all it took about 30 minutes total to make these, with prep and bake. I'm fast and mine only took 15 minutes in the oven.

Oh look at how yummy and moist they look! These are a bit on the cake side of muffins but still awesome for snacks and breakfast! I wish we had powdered sugar but I realized to late that I had forgotten to pick some up. I hear these are awesome with cream cheese frosting, though I think that would make them a bit sweet for breakfast. I had one that I smeared just regular cream cheese on and it was very yummy!
All in all pretty good idea and really easy to make. You can add the eggs and stuff it tells you on the back of the mix to make them more "cake" like and I'm sure the cream cheese frosting would be great with that. I choose the more muffin like way though, much less work.
As we taste tested these we came up with some more variations that I will try and post about later. These include carrot cake, sweet potato, banana nut, with various raisins and seeds, mostly other sweet yest savory options. I'll probably make up a few more batches and make a mass post on all variations. These are relatively inexpensive too! This set cost me like 6 bucks with having to buy muffin cups.
Well until my next adventure!
Jamie <3
http://pinterest.com/pin/296182112963752106/
It's for TWO ingredient pumpkin muffins. Which I have to say are the best idea EVER! I've been wanting to try this for a while and now I have! Here's what happened....
First off I varied mine just a bit, I used a spice cake mix instead of a yellow cake mix. Mostly because I saw the mix at the store and thought it sounded better.

(Oh, make sure you use just pumpkin NOT pumpkin pie filling.)
So it's pretty easy. Just open both and mix them together. No adding eggs, milk, oil, water, none of that. Just the dry mix and the pumpkin. At first its a bit hard to get the pumpkin to mix.

But just dig in there and give it a good stir! Don't try to fold it in nicely or it won't mix. Eventually you'll get this! A nice thick batter! Yes it will be thick, and very orange. Not that the picture does it much justice on the color.

So then you just put it in muffin cups! It's supposed to make 24. Mine made 20 cause I over filled a couple. Also I had a bit of trouble with the sticky batter and lost a bit. I suggest patience with this step.

Now pop them in the oven at 350 for about 15 to 20 minutes. Really it doesn't take long at all. They will rise some but not a whole lot.

Tada! Pull them on out of the oven! Just make sure they're finished just like you would cupcakes. The house smells wonderful! All in all it took about 30 minutes total to make these, with prep and bake. I'm fast and mine only took 15 minutes in the oven.

Oh look at how yummy and moist they look! These are a bit on the cake side of muffins but still awesome for snacks and breakfast! I wish we had powdered sugar but I realized to late that I had forgotten to pick some up. I hear these are awesome with cream cheese frosting, though I think that would make them a bit sweet for breakfast. I had one that I smeared just regular cream cheese on and it was very yummy!
All in all pretty good idea and really easy to make. You can add the eggs and stuff it tells you on the back of the mix to make them more "cake" like and I'm sure the cream cheese frosting would be great with that. I choose the more muffin like way though, much less work.
As we taste tested these we came up with some more variations that I will try and post about later. These include carrot cake, sweet potato, banana nut, with various raisins and seeds, mostly other sweet yest savory options. I'll probably make up a few more batches and make a mass post on all variations. These are relatively inexpensive too! This set cost me like 6 bucks with having to buy muffin cups.
Well until my next adventure!
Jamie <3
Subscribe to:
Comments (Atom)